Building your own CHEAP woodburning controler
|
This page was originally written as a post to a question on Woodcentral turning forum.
A small knowledge of electronics is needed, but if you are looking for a cheap solution for woodburning, you can't beat that.
|

|
but first of all, a note of caution:
WARNING
NEVER OPEN A COMPUTER POWER SUPPLY. ALWAYS DISCONNECT POWER BEFORE DOING ANYTHING WITH IT.
A COMPUTER PSU HAS HIGH VOLTAGE CAPACITORS CAUSING ELECTRICAL SHOCKS HAZARD, EVEN WHEN POWER IS DISCONNECTED.
THIS PAGE IS INTENDED FOR PEOPLE HAVING A KNOWLEDGE IN ELECTRONICS, AND IS PROVIDED AS IS. IMPLEMENTING THE SOLUTIONS DESCRIBED IN THIS PAGE IS AT YOUR OWN RISK, AND NO LIABILITY IS IMPLIED.
Don't use your working PC to do this, find an old power supply (there is always the risk of destroying it)
Finding the PSU
|
First, I recommend to use an old power supply, who has a ON switch on the primary.
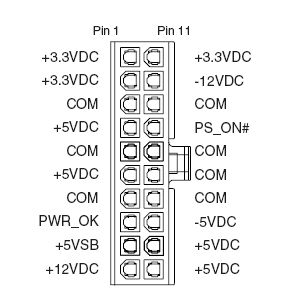
If it doesn't, there's a signal called REMOTE_ON or PS_ON on the connector. In ATX (market standard) PSU (2*10 connector), it's pin 14 (no standard color). Pins 13,15-17 have black wires. It's GND (labelled COM on the picture).
When PSU is plugged, but not ON, 2 signals have a positive voltage (GND=reference).
One is 5v standby (+5VSB), pin 9. The other is PS_ON. Short this pin to GND to power on. If any, the PSU fan must be spinning.
(you can look at the pinout in the ATX specification)
The same principle is valid for non standard PSUs, just find the 2 wires having a voltage when the PSU is OFF. (PS_ON is usually lower than 5V standby)
5V outputs have red wires, 3.3V are orange. 12V is yellow. -12V is blue.
|

Seen from bottom (opposite to wires)
|
You can connect your tip to 5V (or 3.3V) and GND. if it doesn't get too hot, that's it. otherwise, you need to find a mechanism to adjust the power.
Adjustable output
Some might suggest to find inside the PSU the appropriate components to modify, to adjust the voltage (playing on the regulation feedback loop).
I strongly recommend not to do that, as first it can be difficult to locate these components, and above all it can be dangerous too, as there is a high voltage too (up to 400V dc). So DON'T DO THIS. Moreover, the adjustable voltage will probably limited to 2.5V, which could be too high in some cases.
|
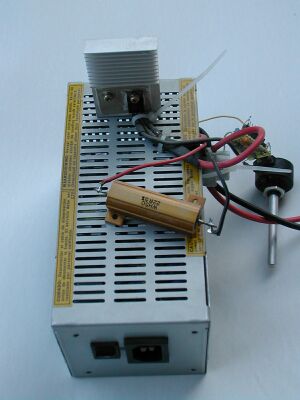
So I connected to the 5v output a PWM controler, based on a TLC555 (fixed frequency, variable duty cycle). The web is full of this kind of circuit, one example is shown here. I recommend to make it run at a pretty low frequency (~100Hz), to minimize commutation losses. You can play with this by adjusting the 22uF cap. The diode is a classical 1N4148.
This circuit is powered by the 12V supply (yellow wire), and the output is connected to the gate of a N-MOSFET with a Rds-on as low as possible.
Source is tied to ground, and drain to one pin of the burning tip. The other tip pin is tied to +5V (or +3V, choose the one which has the higher current rating: that's written on the PSU). Mount the MOS (preferably TO220 package or bigger) on a good heatsink, as it will get hot.
PSU usually don't like to have this kind of switching load, the regulation gets crazy. So you need to add a permanent load on the 5V line, say 100 ohms.
|

|
|
You can even power a fan to blow away the fumes with the 12V line, but I recommend a bigger one on the mains (between 10 and 15 Euros or $).
This circuit has probably not all the bells and whistles of a commercial one, but you can start woodburning for less than 5$.
|

|
|
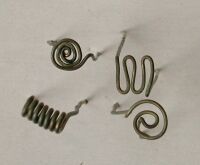
One more trick: if you want to make your own tips, buy some Nichrome wire. this is a resistive wire used in heating devices (alloy of Nickel and Chrome).
|

|
Last update: 01/12/2004.
|
